WHICH ONE IS THE BEST DSLR CAMERA TODAY?


            In a world so advanced and filled with technology, companies try to make their best products giving you the opportunity to get the best results. The Digital Cameras or DSLR world is not behind in technology. Today we have resources that years ago people did not even though could exist from latest technology lens to high performance flashes. Most of the things we see today in photography didn’t existed ten years ago. I am one hundred percent sure that if you were to tell a photographer from the 90’s that you can storage more than a thousand pictures in a two grams SD card thy would take you as a joke.
© Rolando Photography 2013

            Of course I have to say that having a Canon EOS 1Ds x Mark III or a Nikon D3X really helps. But because you have the latest technology does not mean you are always going to get the best results or photos. Photographer Chase Jarvis once said: “The best camera is the one you have with you,” this quote couldn’t explain this better I have seen photographers using super expensive equipment but when I see their photos the results aren't as good as I expected. The goal is to know your camera, once you know your camera and you have full control of everything you will always get spectacular results.
            A couple years ago when I was starting photography one of my hardest decision was choosing my first DSLR camera. Today many beginners pas trough the same thing especially nowadays that there are too many cameras to choose from. Here are some tips that I want to share with you if you are deciding on getting your first DSLR. First review your budget, how much money do you count with or how much money are you willing to expend on a camera. A decent DSLR camera worth around a thousand dullards. Now I am talking about decent DSLRs like the Nikon 3200, Nikon 5200, Canon T3i, and Canon 4i. These cameras are really good for beginners. They are really worded their prices. Second go to a camera store and play with them this might sounds silly but  it really helps you might not like the way a camera feels on your hands, you might think it is too heavy or too light o or maybe you just don’t like the way it is designed. Once you have decides on a camera that you like don’t go crazy and buy it where you think it is cheaper. Go online and research on it you might found things that you don’t like in online reviews, watch hands on reviews on YouTube. This step is the most important when choosing a camera because you get a lot of feedbacks and advice from photographers who use the camera that you like.
            When buying you can find a lot of great deals online but don’t think that you are always getting the best deal on line. Sometime local stores can give you great offers without having to pay the overpriced shipping fees that online stores have. If you are purchasing a camera (body only) the price won’t be too high, but when you add the lens, memory cards and etc. the price can get really expensive. This is why I would recommend camera bundles. Companies trying to sell more create camera kits giving you more for less price. You have to take advantage of that finding the best that matches you.
             If you have any questions feel free to ask them on the comments section. I will try to answer them.

CHOOSING A STUDIO BACKDROP (STUDIO BACKGROUND) TIPS


Today I would say that more than fifty percent of professional photos are taken in small studios or home studios. This is good because this means that people are using more the space. Building cheap home studios using affordable materials.
            In this post I want to share with you an easy way of setting up studio backgrounds. Many photographers use studio backgrounds also called studio backdrops. A photography backdrop is just a piece of fabric, paper or vinyl used to get a pattern or plain background in your modeling pictures.
I personally do not like using patterns background. In my opinion pattern backgrounds should change depending on the models outfit, makeup and the meaning that you of the photo. Unless you like to have a collection of hundreds different patterns it is easier to use a green screen and add the background using Photoshop.
Now I am a big fan of plains backgrounds. First because when using a plain background the photo is more focused on the model or the object that you are shooting. Second the photo does not look overfilled. Third because both you and the model look more professional.
What backdrops colors should I buy and why?
 Well we all know that the green color is mostly used in photos and videos with the purpose of been able to remove the background easy using Photoshop or any other software.
If you are a beginner or semiprofessional photographer you definitely want to begin with a white backdrop. Why? Because they do look professional and you will get great shoots. But why white? Well at first you want to learn how to play with the backdrops and the lighting of your photos, the color white makes it easy for you to notice the shadows and reflections in the photos. After you have an idea on how to shoot studio pictures then you can move on to other backdrops colors like grey, black and etc. always keep in mind that you should not use too saturated colors because your photos do not look good, they look out of contrast and overfilled. My favorite backdrops I would say that are black and gray because black gives a mystery emotion to your portraits and grey well grey just goes with everything.
Where can I buy good backdrops?
            Well basically everywhere. If you don’t want to deal with any issue I recommend you to buy them online on Amazon, eBay or any other site. But this are not the only options can make your backdrops out of anything. You can use fabric from Walmart (any other store) or you can just buy paint and paint a wall. Now be careful when choosing paint most paints are made to reflect the light and you don’t want that otherwise all the lights that you use will reflect on the background, make sure it is flat paint for example flat black it should not reflect any lighting. This is why I don’t like using a painted wall as a background. I rather prefer fabric or vinyl because fabrics and vinyl absorb light and don’t reflect anything.
            The size of the backdrops depends on you on how much space do you have. On average a regular home studio backdrop is around 8ft by 12ft. 8ft wide should be enough for you to shoot in different angles and poses and you sure need at least 12ft of height so you can have at least 8ft of height and around 4ft on the floor so you don’t leave the feet or shoes out of the picture.
            And that is pretty much all you need to know to get a nice studio backdrop. Set it up play with the lights and I guarantee you will get some great photos.
            If you have any questions feel free to ask them on the comments section. I will try to answer them.

ADOVE PHOTOSHOP CREATIVE CLOUD NEWS. YOU CAN NO LONGER BUY ADOBE PHOTOSHOP


            Yes you read the title right, you won’t be able to buy Adobe Photoshop anymore. Adobe announced this year that The Adobe Master Collection Creative Suit 6 (CS6) will be the last full product that you will be able to buy. Instead they came with Adobe Creative Cloud (Adobe CC) a subscription only system.
            What are the differences between the old Adobe software system and the new Adobe Creative Cloud? As we know ADOBE MASTER COLLECTION CS6 which includes Photoshop CS6, Photoshop CS6 Extended, Illustrator CS6, InDesign CS6, Adobe Muse, Acrobat X Pro, Flash Professional CS6, Flash Builder 4.6 Premium, Dreamweaver CS6, Edge Animate , Edge Reflow, Edge Code, Premiere Pro CS6, After Effects CS6, Audition CS6, Speed Grade CS6, Prelude CS6, Encore CS6, Bridge CS6, Media Encoder CS6 costs around $ 2,500 USD, is not on sale anymore by Adobe. The new Adobe CC includes 12 different programs updated like always trying to optimize their products.
Now the big change is on the purchasing system you are not able to buy it anymore the new Creative Cloud is based on a subscription only model. The full CC is $ 49.99 a month (on yearly contract). That comes out to $600 a year to access every single software title Adobe makes available. Now if you are like the majority who only uses Photoshop or any other software you can purchase any single software in the Creative Cloud for $ 19.99 a month which is $ 240 a year.
In the past if you purchased the software it was completely yours, it never expired, you could continue to use it even after the new version came out. This was great for a lot of amateur users who do not need a new upgrade every year. But for the professional photographers whose Photoshop is like their right hand and always get the latest update this is great. In this case you are just renting the software and every time a new update comes the price will remain the same if you choose not to re-up you no longer have access to the programs.
If you do the math it was $ 2,500 every new software and they come up with upgrades yearly, the new system is $ 600 a year so this means that what you pay on the old system for one upgrade will be the equivalent to more than 4 years of subscription. In other words with what you had paid for one upgrade you will now get 4, in my opinion this is great for those who pay the full program.
I think one major issue is that $ 19.99 a month for a single software is too much. I think $ 10 a month is fair for those who only use Photoshop. $ 240 a year is a lot more than what beginners can afford to expend on a software.
Now why is Adobe moving to a subscription only system? I will like to point out that Adobe is not the first company to do this. First they wanted to focus on developing the best products possible which now is Creative Cloud. Another reason and one of the mayor for them is trying to control the pirate copies which will never end but this new system will sure cut the amount of people using the software without paying. And finally a third reason is being able to update their software whenever a new feature is ready instead of waiting 18 months for the next product cycle, and this in my opinion is the most important.
I have done some research reading the opinions and reactions of users to this new thing and there are a lot of question like “Can you work on the software when you are not online?”  Yes. They said that you van be 99 days without being connected to the internet before your software locks you out. “Can you use your account on multiple computers?” Yes. All you have to do is log into your creative cloud account form any computer anywhere and all of your settings and shortcuts are right there for you to use. This is a really cool feature and something new I think is well worth it. “If I stop paying will I lose all my files?” No. Your files will remain there however you might not be able to open them without the software.
I tried to cover some of the most common question out there so don’t freak out this is a new thing and a lot of people think it is complicated but it is really not, give it sometime and everything will be normal .
If you have any questions feel free to ask them on the comments section. I will try to answer them.

HOW TO MAKE YOUR OWN SELF-PORTRAIT. COOL PROFILE PICTURE OR TIMELINE PICTURE FOR FACEBOOK OR INSTAGRAM ETC...


There is nothing like Self-Portrait to have on your website or on your Facebook page.

     Why Self-Portraits are important?
Every artists subject of art is different but the self-portrait is the one subject shared by every artist.
Self-portraits are not just what the picture looks like but self-portraits also shows how the artist feels and see themselves and how they see the world around them. I would say that a self-portrait is a picture of what the artist looks like on the inside and his most important subjects.
     From another point of view, self-portrait photography is a great way to improve your skills and make you look like a pro. If you don’t have a model you don’t need one. You can work yourself into different poses like just a plain smile, a crazy look, that classy suit mode or even just yourself looking to the sky and etc. There are millions of poses that you can pose in self-portraits. So next time you have a free time and a camera available think about it and create some original photos.
     I recently got a new DSLR and I could not wait to try. I asked a friend to take some pictures of me, but as you know if you want something well done you have to do it yourself. All you really need is a tripod and of course a camera. Now if you don’t have a buddy or a friend you will need something to focus on. When you set your tripod and camera in place you look in the viewfinder and you will see that it will be hard to focus when there is nothing on the place that you will be standing, this is simple one easy solution to this problem is to bring another tripod or microphone stand (something to put on your spot) the height or size does not matter, what matters is the distance from you to the camera. Otherwise your pictures will look blurry.
     Use both auto and manual focus. Use the auto-focus to focus on the object that you placed in your spot then switch your lens from auto to manual focus this will look the focus at the distance needed.
    When it comes to lights try using as mauch natural light as you can or if you have a studio try different angles of lights playing with your pose and the camera angle. Maintain the ISO as low as you can so you don’t get any noise on the picture this will help you if you are going to work on your face and need to make some arrangements like spot remove.
     Now days most modern DSLR (cameras) comes with timers so you can set everything and go stand on your pose, give yourself plenty of time to get ready for the shoot. Once you have the pictures play with it until you find a filter that you like and makes your photo look professional
     My last tip is to use this self-portrait as a source of inspiration for your self-portraits.

This is the original picture I know it does not look professional at all but you will see how the experience and the practice helps you get where you want.

After a few hours of thinking and editing I came up with this for my Facebook timeline.
Of course you will expend more time thinking and looking at it from different ways that actually editing it but that is the point for a self-portrait you want it to be meaning full.

In future posts we will show how to do step by step editing in different kind of pictures.
Keep connected to our blog for more awesome photography tips. Please feel free to ask any question or if you have an idea that you want us to show leave a comment on the section below or email us at to abin.blogs@gmail.com. We hope you find this helpful.

HOW TO COPYRIGHT YOUR PHOTOS


    Well first I want to point out what are the benefits of copyrighting your photo or adding a watermark. It not only protects your pictures from been copied it also is a way of advertising your company or your blog.   Another thing and one of the most important it makes your photos look professional.
I want to start by defining copyright. The term copyright is the short for “rights of copy” by the time you take a picture that picture is yours and you own every right to it. But adding the watermark is the way of you saying that the picture is yours and that you own the rights to it.

To identify your pictures as yours you need to add a watermark (your logo) or just you name or company name on a corner of the picture.


Copyrighted picture.

This will be enough to make identify your pictures and make them look professional.

HOW TO MAKE YOUR PICTURES LOOK LIKE PROFESSIONAL SHOOTS.


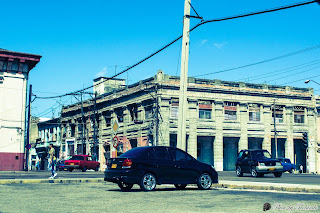
Last month I went to Havana, Cuba it is a rich country in old buildings and beautiful passages that brings those colonial times but at the same time mixed with a new advanced technology of this world.
My main purpose of this post is to show how a simple picture can be edited making you look like a pro. It only takes a few a good picture, a few minutes on your PC or MAC and it will look like a professional photo.

This is the original picture. As you can see I shoot it from inside of the car. And it does not looks nothing special.

This are the steps to make it look like a professional picture
1.       Crop it to the area that you want to focus on.
2.       Add some color corrections based on what you want to show.
3.       Add a nice filter that defines your picture but trying to keep the originality and that natural look.
4.       Add the water mark.

This is the edited picture.

I always recommend to add the water mark to your photos it not only makes you look professional but it also prevent your pictures from been stolen or copyrighted by others. This is how to make your pictures look like professional pictures. 

I hope you find this useful please leave me comments what you think or if you have any questions I will be more than happy helping you.
© Rolando Photography 2013